A Banking Project for You and Your Kids
 Each year, I invite my Grandchildren to a one week overnight camp I call Grandma Rie’s Money Camp. During that week, we focus on personal finance concepts, activities, projects and fun. This year’s camp had the main theme of saving.
One of the activities we did, was to create paper mache piggy banks. This fit well with our overall theme of saving and was something that could be done without spending a lot of money.
I presented the idea of making them as one that could produce a product to try to sell, a gift to give or a bank to keep for themselves. The 7 year old girl decided to keep one and give the other to her cousin. The 10 year old boy decided to try to sell his two.
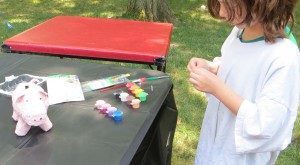
Materials needed:
We made 5 banks including the demo one I did before camp. This is what we used.
- 5 – 8 oz Dr. Pepper plastic bottles
- Masking tape
- Paper (I used the paper from the movers from my Mother-in-laws recent move – you could use newsprint)
- Flour and water paste
- Paper cups
- Sandpaper
- Paint, ribbons and other decorative items
- A pan or bowl to let kids rinse hands
- Rags
Prep work for the adult beforehand
DRY OUT THE BOTTLE
With label removed, wash and dry the empty soda bottles and bake for an hour in an oven proof bowl at the very lowest possible temperature (170 degrees Fahrenheit is what I used).
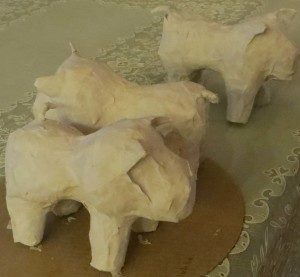
MAKE THE LEGS.
Cut a paper sheet so it is about the size of 1/2 of one piece of newsprint.
Fold that sheet lengthwise to a width of about 2 or 2.5 inches, then roll it up until it is about an inch in diameter. You need 4 per pig.
TAPE THE LEGS TO THE BODY.
Using the masking tape, position each leg where you want it on the soda bottle and secure it first with four strips of tape. After you get all the legs in position, add lots more tape to hold them to the bottle.
ADD A HEAD.
Using a small (8×10 sized) piece of the paper, scrunch it up and tape it around the lid end of the bottle, leaving the lid sticking out just a bit. Keep adding scrunched paper until the head is large and looks right to you.
ADD BULK TO THE LEGS AND BODY.
Right now, the rolls that are to be the legs are straight. Pigs don’t have straight legs, add more bits of wadded paper to add bulk and curves to the legs, including hocks. Add some bulk to the shoulder area and rump as well.
MAKE AND ATTACH THE TAIL.
With a tiny piece of the paper, roll up a short piece on one end (leaving the other end flat to attach to the rump) and then curl it around a pencil.
Tape the flat end to the rump of the pig and then wind it around the rest of the tail to give it some strength.
The pig form is now ready for the kids!
Here is what we did:
Set up a work area.
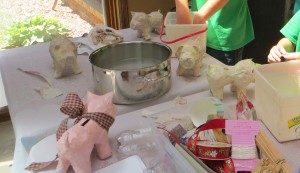 Kids will be messy. Paper mache is by nature very messy!
I put up a couple of card tables in our sunroom – which has a concrete floor and very little furniture, and covered them with plastic tablecloths. We also put a fan in there since it was summertime and it gets warm in the sunroom.
Fill the rise pan and make sure the rags are close at hand to dry with.
Make sure the paper is handy and all other objects are removed from the work area.
Put the pigs to be covered out on a metal tray or piece of cardboard to help absorb some of the paste which will inevitably spill or drip.
Kids made their own paste.
To avoid squabbles, each kid got their own paste bowl and made their own flour and water paste.
Kids tore their own paper strips.
Demonstrate and work one your pig while they work on theirs.
If your kids haven’t ever done paper mache, you will want to show them the best length and width for the paper strips, and to demonstrate the easiest way to apply the paste ( we dipped them in the bowl and scraped off the excess between fingers) and help them remember to apply only one layer and to cover the entire pig.
Laying the strips adds strength, so be sure to have them secure the legs and tail to the body with the pasted strips.
Reinforce the finance topic at hand.
As you work with them, discuss saving – why save, where to save and etc.
Dry and add layers.
 I put the pigs onto a piece of sturdy cardboard and then on a cookie tray and put them in the oven (again at the very lowest setting) to bake dry for several hours. Then we let them air dry for a day.
We added two more layers in a similar manner.
Sand if you want.
On my demonstration pig (the one I made before the kids came), I carefully sanded the mached, dry pig to take off some of the rough edges – using my mouse electric sander.
Spray paint.
After sanding and getting the dust off, we painted our pigs with pick spray paint. The kids enjoyed spray painting (which we did outside on the gravel driveway with a paint cloth surrounding the pig!) so each one got several coats.
Cut the coin slot.
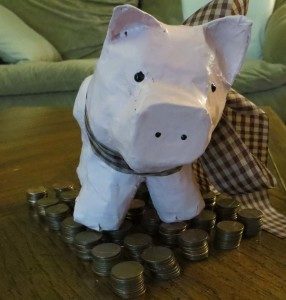
This is obviously another task for the adult. I used an exacto knife – after marking where I wanted the slot. I made our slots big because we didn’t put a hole in the bottom of the pig belly to plug with a stopper. The only way we could get the coins out of our bank was to shake them out through the coin slot, so I super-sized them.
Decorate.
I just used puff fabric paint (which I happened to have on hand) to dot on the eyes and snout and then tied a ribbon around my pigs neck.
The boy just did the eyes and snout and left his plain.
 The girl opted to paint designs on her pigs with the acrylic paint I provided (be sure to have them paint outdoors or in a protected area and wear a paint smock when painting with acrylics!).
Results.
Unfortunately, the boy’s pigs did not sell. He took them home. My Granddaughter kept one and gave one to a cousin and I kept mine after signing it and labeling it with ‘Grandma Rie’s Money Camp 2014’.